 In a previous blog post, we talked about some ideal projects for ostrich leg leather. Examples of great projects for this particular exotic leather included:
- Boots
- Phone Cases
- Wallets
So, if you’re curious about using ostrich leg leather in your next project, you probably want to know one thing: how can I get the most out of my ostrich leg leather?
Well, here are a few tips for working with ostrich leg leather to help you out:
Tip #1: Keep the Dimensions of the Leg Leather in Mind
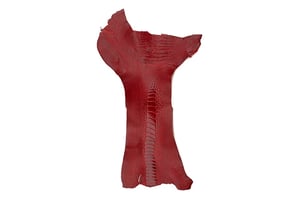
The typical sample of ostrich leg leather is about 18” long, and 8” wide at the top. The middle of the leg, however, tends to be about 4” wide, about half the width of the upper portion of the leg. The lower portion of a cut of ostrich leg leather is a bit wider than the center, but not as wide as it is at the top.
Keeping the tapered center portion of the leg leather in mind when planning out your panels is crucial to making the most out of your order. If a panel would use the majority of the leg, then that panel can only be about 4” wide at the widest point and still only use a single leg.
This is one reason why, when making boots, ostrich leg skin is only used for the vamps of the boots most of the time.
Tip #2: Decide How You Want to Display the Center Leg Scale Pattern
One of the most distinctive features of ostrich leg hide is the long column of large skin scales running down the center of the leg. These large, flat plates of hide are an obvious focal point for any design using this particular exotic material.
So, naturally, you’ll want to make the decision about how to display these scales before you finalize your design, let alone start making panels.
For example, if you’re making leather wallets, you can arrange your cuts so that the center scales run down the spine of the wallet, or across the length of the wallet. When making particularly small accessories, such as watch straps, card cases or jewelry, you can avoid using the center scales entirely.
Whichever way you want to display or avoid displaying the center scales, it’s important to keep this in mind when planning out your panels for your exotic leather project.
Tip #3: Stick with Higher-Grade Skins for Project with Larger Panels
Because these hides are so narrow at the middle, there’s rarely room for working around scratches or other flaws in the hide. For this reason, it’s usually best to order grade I skins for your exotic leather project when working with ostrich leg leather.
If you’re making very small accessories, then should be able to get away with grade II or III skins.
Tip #4: Consider Other Exotic Skins to Fill Out Extra Panels
As we mentioned in the “Perfect Projects for Ostrich Leg Leather” blog, a single ostrich leg doesn’t usually have enough leather to make a single complete boot. To fill out the extra panels that you need filled on such projects, consider pairing your ostrich leg leather with other exotic skin or leather. Making a large product from only ostrich leg would require a lot of paneling, which can be costly and compromise a clean aesthetic.
These are just a few basic tips to keep in mind when you’re working with ostrich leg leather for your next exotic leather project. For more info and tips about exotic leather, check out some of our other blogs!


